
Heard of Mary Phillips makeup technique? Mary Philips, a well known celebrity makeup artist who has worked with big Hollywood stars, the celebrities we all are obsessed with like Jennifer Lopez, Kendall Jenner and Hailey Bieber and many more! All these celebrities love using Mary Phillips makeup technique and it’s now going crazy on TikTok also.
Mary Phillips makeup technique is best way to achieve a natural and effortless contoured face. Mary Phillips is famous for making makeup effortless. Contour before the foundation is her mantra. This Mary Phillips technique is now used by many celebrity makeup artists to create effortless makeup looks.
This technique is quite a lot in trend these days because this makes the makeup look a “no makeup look” which we all are obsessed with. For Mary Phillips, there is no order in makeup. Her technique involves the application of contour and highlight before the foundation. It’s like laying down the bones under the skin. The contour and highlight are the bones and skin is foundation.
Today, I am going to show you the step by step tutorial of Mary Phillips makeup technique.
Related: Makeup Tips! Make-Up Is Not So Hard, You Know
Step by Step Mary Phillips Makeup Technique
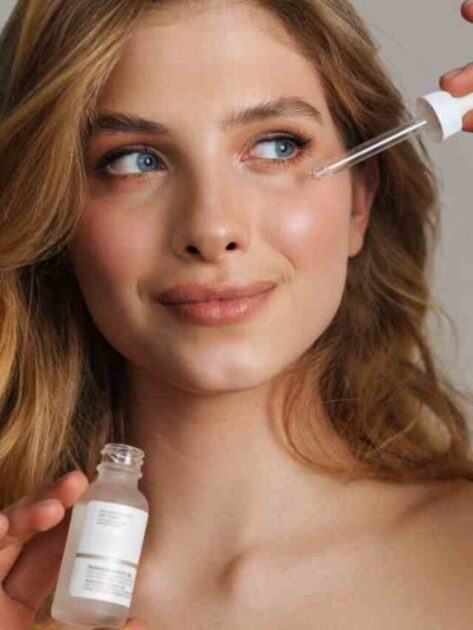
First of all prep the skin before coming to the contour. Hydrate your skin with a moisturizer or a serum so that the products absorb blend well into the skin. Also, do not forget primer as it will blur the pores for a more clean look.
Laying Down the Bones with Contour
Contouring forms the backbone of this technique. Start by selecting a contour stick or powder, I am going to use the contour stick by makeup by Mario and a fluffy brush for the application. I’ll take some contour on the back of my hand and then apply it onto the bones. The best part about applying contour first is the fact that you do not need to worry about the mess that it creates because we are going to apply the foundation afterwards. Contour your cheek bones and forehead or whichever part you want to contour. Then blend upwards to create a lifted look.
Polishing with Concealer
The next step is using concealer. To refine the look and clean up any harsh lines, use a hydrating concealer, I am going to use hydrating Camo concealer by elf. Apply concealer to your under eyes and below your cheekbones to remove any harsh lines of contour. Mary suggests applying concealer to the high points of the face. Applying concealer after contour is best as it cleans everything up.
Blend your concealer and as you blend you’ll understand what Marry Phillips means when she says “Lay down the bones”. Many people stop at this step because it also looks amazing. But for a more polished look, you can go for foundation. Sure, it still looks a bit rough, but once the foundation is evenly distributed over your skin, the end result will be a flawless finish.
For glowy look, do not forget to apply highlighter to the high points of your face like forehead, cheekbones, chin. Mary Phillips prefer applying a liquid highlighter as it is easier to blend and give more natural look.
Also Read: Dewy Summer Makeup Look: Effortless Freshness and Luminosity Unleashed
Achieving a Melted Finish with Foundation
Take your makeup to the next level by applying foundation mixed with a hydrating serum. This combination adds a seamless, melted effect to your makeup. I am using Makeup Forever Ultra HD Foundation. Mix approximately three pumps of foundation with the serum on the back of your hand. Use a large fluffy powder blush to blend the foundation instead of a beauty blender because Mary Phillips uses a fluffy brush for foundation application.
Apply it in upward strokes on your face, ensuring to warm the product beforehand. The result is a stunning, blended finish that unifies all the different segments of your makeup.
Enhancing the Glow with Blush
Unlike some methods that apply blush underneath foundation, I decided to follow Mary Phillips approach of placing an intense blush on top of the foundation. I opted for the iconic Nars Orgasm blush and used a dry sponge for precise application. This technique allowed the blush to stand out vibrantly without picking up any product from underneath, creating a stunning, lit-from-within glow.
Optional Setting for a Full Glam Look
While setting my makeup is not always necessary, I decided to use my trusted Makeup by Ariel A14 brush to gently set the areas beneath my eyes, beneath my cheekbones, and around my mouth. This step helped ensure a longer-lasting, polished appearance.
Glowing skin, popping cheekbones and on top of that your face does not look loaded with makeup. What else do you need? Thanks to Mary Phillips for sharing this technique. Compared to the traditional contouring after foundation, I actually think the Mary Phillips Makeup technique is a more popular approach for a more natural look. As someone who doesn’t like the feel of layered makeup on my face, I find it much simpler and love how it looks better.

")


")


